More violence in this lesson as you learn some more ways of killing the enemy king.

Most of these ideas involve SACRIFICES, and very often QUEEN SACRIFICES so watch out!

To solve them you will have to LOOK AHEAD and CALCULATE. All the ideas in this lesson are worth remembering - they may well happen in your games.

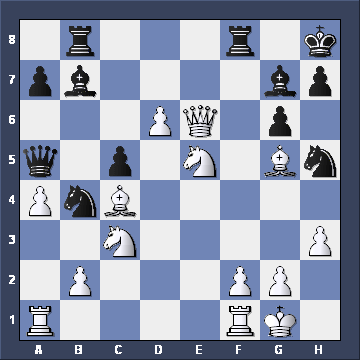
This position happened in one of my games.

I had the White pieces - how did I get a quick CHECKMATE?


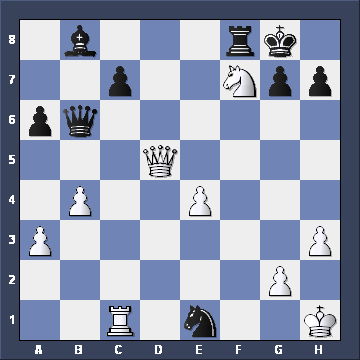
White can KILL the Black King by playing Qe6-g8+!

Here's the position. Do you see what's going to happen next?

Black has only one move - he must take with the Rook (note that Kh8xg8 is illegal because of the White Bishop on c4).

And next move White's going to play his Knight to f7.

The Knight CHECKS the Black King, who cannot move because he is surrounded by his own men.

This sort of checkmate is called SMOTHERED MATE - learn it!

The same idea often happens with a Knight instead of a Bishop supporting the Queen.

In this case we need to play a rather clever knight maneuvre to reach a square which controls both f7 and g8.

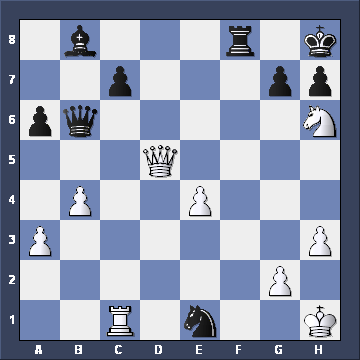
Have a go at this position from the Ukrainian Girls Under 10 Championsh


Yes, White played Ng5-f7+. Now if Black takes the Knight White has a BACK RANK MATE.

So instead Black played Kh8-g8, with this position. Where's the Knight going next?


Yes, the Knight has to go to h6 - to control both f7 and g8!

It's DOUBLE CHECK so the King has to move to h8. You know what to do now!!


You've seen the idea before: The Queen checks on g8. The Rook has to take, and then the Knight delivers MATE on f7.

This is known as PHILIDOR'S LEGACY - named after the same guy who gave his name to PHILIDOR'S DEFENSE.

Now for a rather different idea.

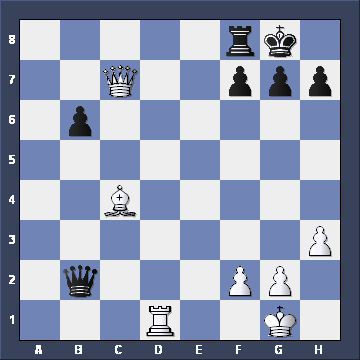
Can you see how White can force a quick CHECKMATE here?


Here's the position again. If you didn't get it right see if you can follow what happens from the diagram?

White's first move is Qc7xf7+ - another QUEEN SACRIFICE!

If the King moves into the ccorner, Qf7xf8 is MATE, but if the Rook takes the Queen, what then?

Have a look at the whole board and you'll see that Rd1-d8 is CHECKMATE - because the Black Rook is PINNED by the Bishop on c4.

Our old friend the BACK RANK MATE, but with a twist!

Now see if you can take the White pieces and win this position. Black's just played is Queen to d4, THREATENING MATE on f2 as well as the Rook on a1 and the Bishop on c4.

If you remember our lesson about attacking and defending the castled King you should get White's next move.


White's only good move - and it's a VERY good one - is Qd1-h5, THREATENING mate on f7. Now Qd4xf2+ doesn't help Black so he played h7-h6.

This is the tricky bit - what should White do next? Remember - we're going for CHECKMATE!!


Again, if you didn't see the move first time round, see if you can follow it from the diagram.

White plays Qh5-g6, renewing the THREAT of MATE on h7.

But what happens if Black plays h6xg5? Do you see it? White plays a SWITCHBACK - the Queen returns to h5 and this time - because the h-pawn's been DECOYED it's CHECKMATE!

A very common attacking idea - and DON'T YOU FORGET IT!

This example features several different CHECKMATES - some of which you've seen before.

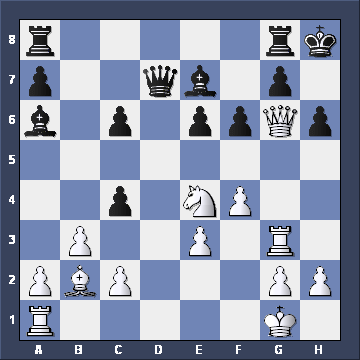
Can you find White's winning move?


After the last example you should have spotted Ne4-g5, which THREATENS both a Queen mate on h7 and a Knight mate on f7.

Black can take the Knight with his h-pawn, but then White has Qg6-h5 which, as we've seen before, is CHECKMATE. But do you see what happens if Black takes with the f-pawn?

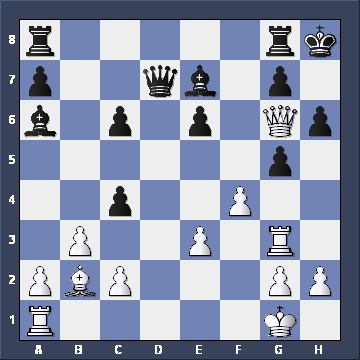
Here's the position, with White to play. I want the QUICKEST way to win, please. Sorry, but no credit for anything else.


An easy question, perhaps. Qg6-h6 is CHECKMATE - look at the Bishop on b2 PINNING the Pawn on g7!

You have to see EVERY piece on the board to play good chess, not just some of them!

Rg3-h3 also leads to mate, but takes longer, so no points! Mate in 1 is better - if you delay it you might lose on time, suffer a heart attack or who knows what else!!

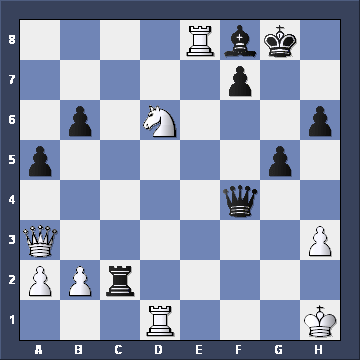
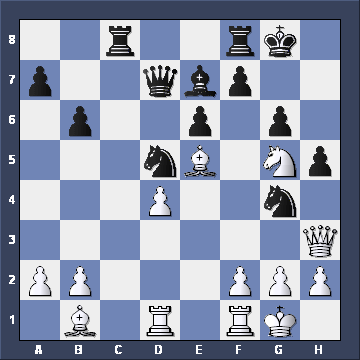
Moving on to our next example, who do you think has a winning attack in this position?

It looks like White can't meet Black's threat of mate on h2 - but at least it's his move. What can he do?


There wasn't a lot of choice, was there? White had to play a check - so the Rook had to take the Bishop. Now if the King moved to h7, White could win with either Qa3-d3+ or Rf8xf7+, so Black took the Rook.

Now White can play a DISCOVERED CHECK, but he has to find the right square to move to. Can you help him?


The correct square for the Knight was f5 - to stop the King escaping to e7 or g7. Now if Black blocks the check on b4 or c5, Rd1-d8 is MATE. And if the King goes to e8, can you find BOTH White's one-move mates?

But if the Black King goes to g8 instead you need to do something pretty drastic to win the game.


Only really violent kids could get that one right!!

The killer is Qa3-f8+, and, like a magnet, the Queen draws the Black King back to f8 so that Rd1-d8 is CHECKMATE!

Or if the King moves to h7 instead, Qf8-g7 is the KISS OF DEATH! An amazing finish - I hope you managed to find all the moves.

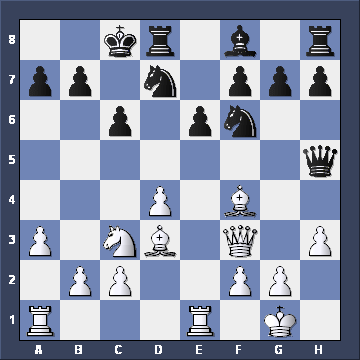
On your left you'll see what looks like a quiet and peaceful scene. Black's trying to exchange queens, but does White really want his Queen off the board?

What do you think?


Don't forget what you use to look at a chessboard. A CCTV!!

EVERY MOVE, look at EVERY CHECK, CAPTURE, THREAT and VIOLENT move!!

Qf3xc6 is a CHECK. It's also a CAPTURE. I guess it's a THREAT to the King and it's certainly pretty violent!

So it should be the FIRST move you look at. And, if you look ahead you'll see that, after b7xc6, Bd3-a6 is CHECKMATE!

If you don't look for them, you won't find them.

This idea crops up quite often against a King castled on the queen side.

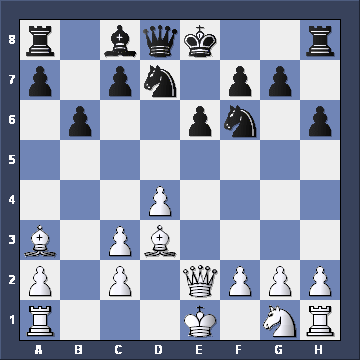
Very quickly, now, use your CCTV again and tell me what you'd play here.

It's White's move again, and you know what happens to kids who don't castle, don't you?


It's the same sort of thing again, but in the middle this time.

Qe2xe6+ and it's mate next move. If f7xe6, the diagonal is open for Bd3-g6, which is CHECKMATE!!

Again, if you use your CCTV you'll find the move.

In this diagram White has a move which wins a vital pawn and destroys Black's defenses.

All you need to find it is - guess what - a CCTV!


The winning move is another QUEEN SACRIFICE - Qh3xh5.

Did you notice that Bishop lurking on b1? (The b1-h7 diagonal is very often a good place for your King's Bishop against an opponent who's castled king side.)

If Black takes the Queen, Bb1-h7 is CHECKMATE!!

This time you have to look a little bit further ahead? Are you smart enough to do it?

Place your bets on White's next move now!


Surprise, surprise, it's the same thing again.

This time we'll show you the diagram after Qh4xh5 g6xh5 Rg3xh5.

You see White's THREAT, don't you? Rh5-h8 CHECKMATE.

Black can delay it by a couple of moves, but he can't prevent it.

A pretty cool QUEEN SACRIFICE, don't you agree?

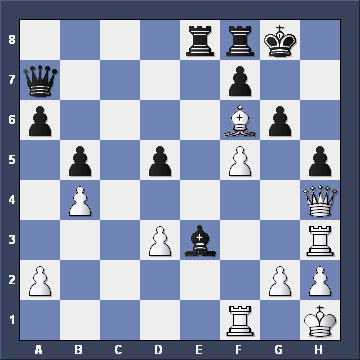
In our final example White forced CHECKMATE in just four brilliant moves.

White has almost all his pieces lined up against the enemy King. But his Knight's in the way. He needs to get rid of it - and play a FORCING move to do so.


If you picked up on the clue you'll have played Nf5-e7+. If Kg8-h8, Qh6xf8 is CHECKMATE, so he has to take it.

Can you work out White's next amazing move? You didn't really want your Queen on the board, did you?


Again, the clue should have helped you. White opted for the spectacular Queen sacrifice Qh6xh7+. Black had only one move: Kg8xh7.

If you want to get checkmate you must first play a CHECK. Look at your Rook, and observe the placing of the White Bishops as well.


This is the point of White's sacrifices. Re5-h5+, and Black cannot take because the Bishop on d3 PINS the g-pawn. So all he can do is go back to g8.

Now it's over to you for the easiest point in the whole lesson.


Yes, it's CHECKMATE. You've seen something similar to this earlier in the lesson.

Can you learn to play as brilliantly as Rudolf Spielmann did in that game from 1929?

You have to do three things:
1. Learn how to place your pieces where they're pointing at the enemy King.
2. Learn the basic checkmate patterns such as the ones you've seen in this lesson.
3. Use a CCTV to look at the board: examine EVERY CHECK, CAPTURE, THREAT and VIOLENT move.

Congratulations!!

You have now completed the MATING COMBINATIONS assignment.