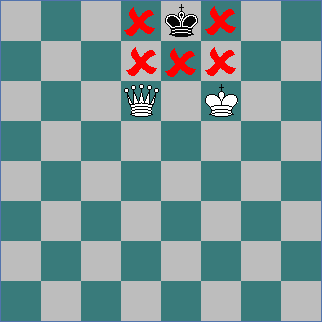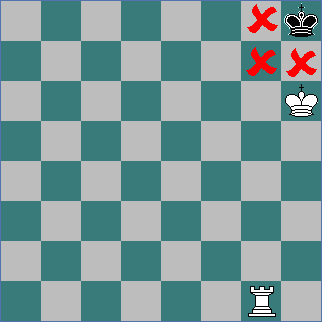
In this diagram it's Black's move. He cannot move his King to a safe square. He has nothing else to move?

What's happening?

It's NOT CHECKMATE, because Black is NOT IN CHECK.

This position is STALEMATE.

STALEMATE is a position where the player to move is NOT IN CHECK but has no possible moves.
The result of the game is A DRAW.


Here, Black is not in CHECK but still CANNOT move the King anywhere.

Is it STALEMATE?

No, it's not!

Black has a Pawn over the other side of the board which CAN move.

Don't forget - STALEMATE is when you are NOT in CHECK and CANNOT move ANY PIECE.


Here's another STALEMATE position.

Wherever Black tries to move his King it will end up in check.

Set the position up for yourself and make sure you agree.

Remember that two Kings can never stand next to each other.


This position shows you how a King in the corner can be STALEMATED by a Queen.

The Black King is not IN CHECK but the White Queen CONTROLS all the squares next to the King.

You can see that the Queen is a KNIGHT'S MOVE away from the King.

Again it's STALEMATE - the result of the game is a DRAW.


When your opponent only has a King left you have to be VERY CAREFUL not to STALEMATE your opponent.

You remember that if you get a Pawn to the end of the board you change it into another piece (usually a Queen.

If White PROMOTES his Pawn to a Queen (or a Rook) in this position it will be STALEMATE - Black will have no moves. Again, play it out for yourself and see what happens.


That's the end of the lesson on STALEMATE.

If you didn't understand everything go through it again in a few days time.

Click here for a quiz on this lesson.